

You've scrubbed the shower corner twice, but the dark line in the grout still looks untouched. The sponge gets wet, spreads the residue, and folds over before it can reach the narrow joint. A paper towel wipes the tile face, while a standard scrub brush catches on the edges and leaves the deepest grime behind.
That's where a crevice cleaning brush earns its place. It isn't a magic wipe or a smaller version of a general scrub brush. It's a precision instrument, designed to place controlled friction inside spaces where cloths, sponges, and broad brush heads can't maintain contact. The useful question isn't whether a brush is “stiff.” It's whether the head, bristles, and handle match the shape and surface of the gap.
Table of Contents
- Why Narrow Gaps Need a Different Tool
- How Brush Design Evolved Into Today's Crevice Brush
- Anatomy of a Crevice Cleaning Brush
- Matching the Right Brush to Each Tight Space
- When a Crevice Brush Is the Wrong First Move
- Care, Cleaning, and Replacement Timing
- Choosing the Best Crevice Brush for Your Home
Why Narrow Gaps Need a Different Tool
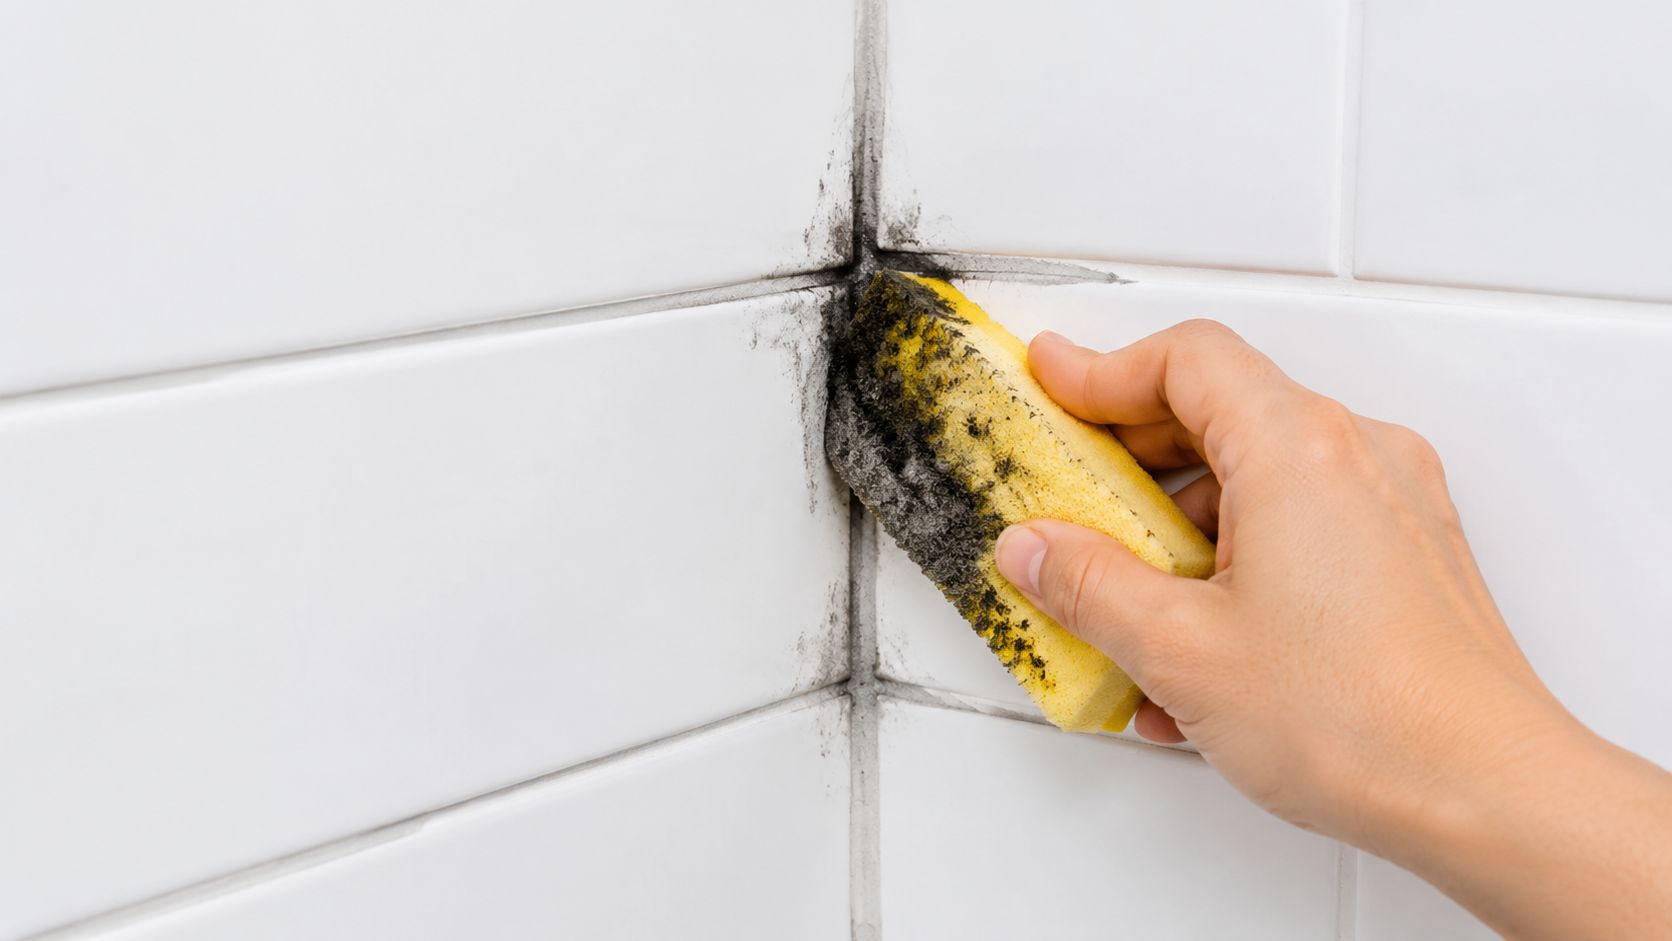
After cleaning a shower corner, you may still see a dark line in the grout. A sponge works across flat tile because its broad face stays against the surface. Inside a grout joint, it compresses against the edges, skips the recessed channel, and can press loosened soil deeper into the gap.
A paper towel removes dust from the visible tile but creates little repeated friction inside a textured seam. A standard scrub brush applies more force, yet its broad head often rides over the surrounding surface. The deepest part of the gap remains untouched.
Contact matters more than surface area
A crevice cleaning brush works by placing narrow filaments inside the recess and letting them flex against its walls. Its cleaning ability depends on friction contact and bristle reach, not on the size of the head. In a window track, a small brush that touches the bottom and sides can remove more compacted debris than a larger one that skims only the upper edges.
Bristle geometry changes the result. Laboratory research on cleaning brushes found that bristle stiffness, density, and angle significantly affect the shear and normal forces delivered to a surface, which influences how well stuck material comes loose (research on brush geometry and cleaning forces). A dense, sharply angled head may work well in a hard grout line. On a soft finish, the same concentrated force can leave marks or increase wear.
Bristles are also a wear issue. A brush that is too stiff for the surface can abrade it, while one that bends excessively may shed or lose its ability to reach the recess. Inspect the filament tips and the trimmed edge after use. Fraying, uneven length, or loose strands indicate that the brush is working beyond a suitable surface or needs replacement.
Practical rule: Read the gap before choosing the brush. Check its width, depth, corners, and material. A narrow opening calls for reach and alignment, while a broad track may need loose debris removed before scrubbing.
Match the tool before adding cleaner
Cleaner can soften residue, but it cannot fix a poor mechanical fit. If the head is too wide, it rubs the tile face. If the filaments are too short, they stop above the recessed soil. If the handle puts your wrist at an awkward angle, you may press harder and increase the risk of scratched surfaces or damaged grout.
Begin with the narrowest opening and the depth below it. Then consider whether the surrounding material is hard, coated, painted, or delicate. Choose head width, bristle length, stiffness, and angle as a set. The brush should enter with light pressure and maintain contact as you move it. Forceful wedging is a sign that another tool, or loose-debris removal first, would be safer.
How Brush Design Evolved Into Today's Crevice Brush
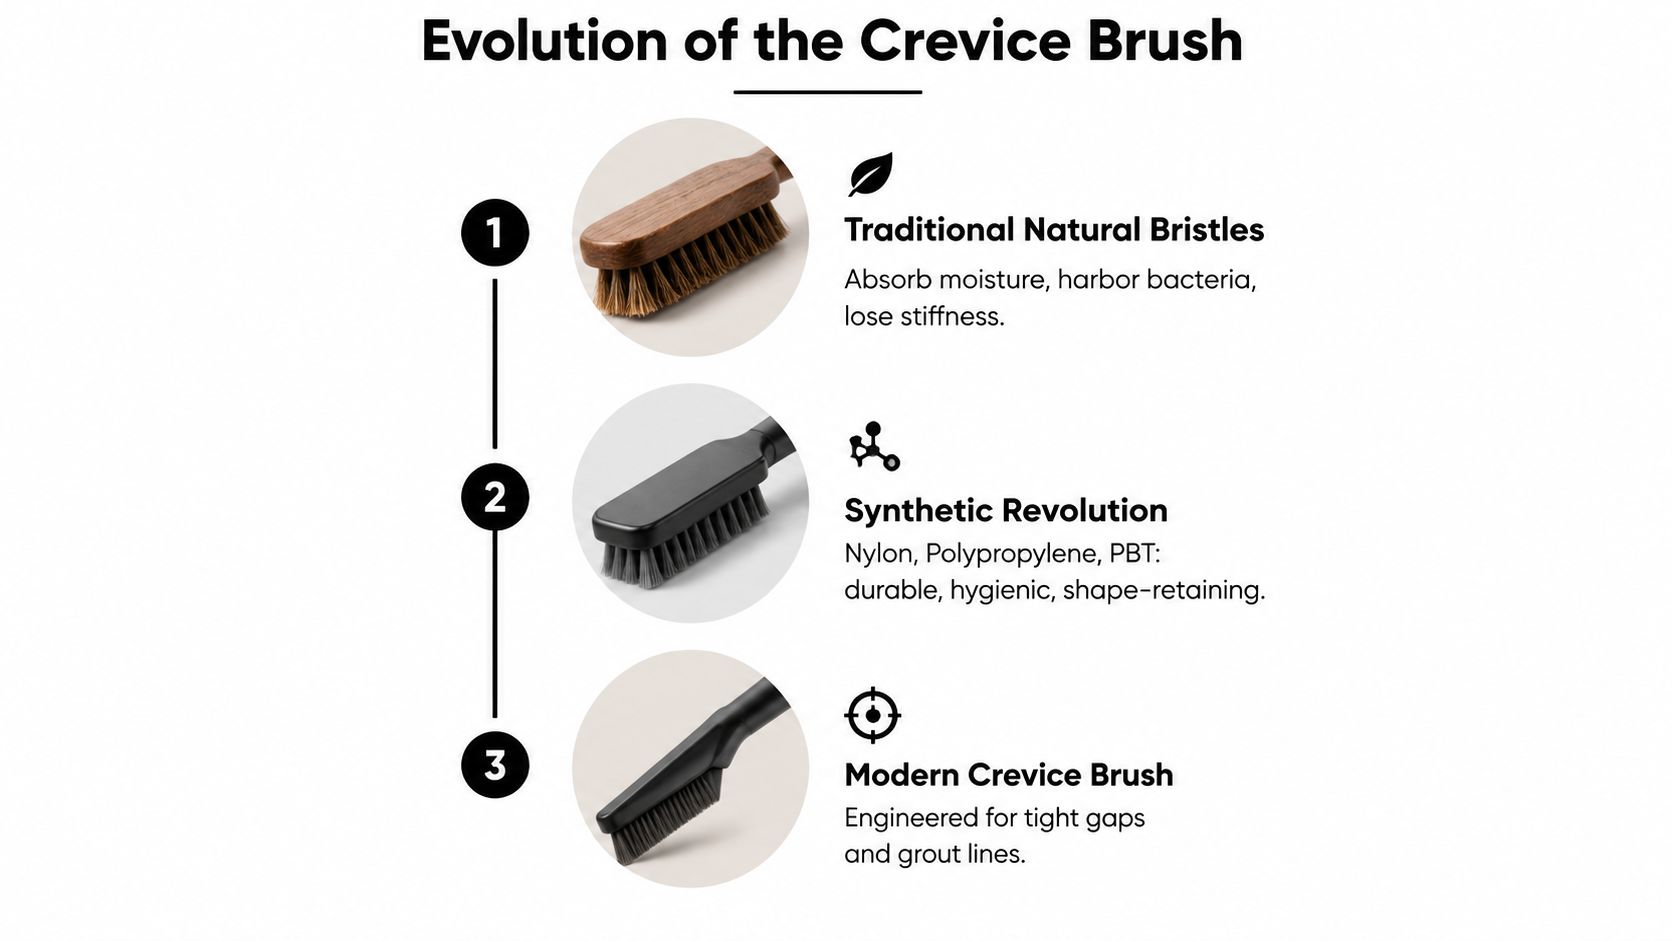
Small-bristled cleaning tools became much more practical after synthetic nylon bristles entered commercial use. DuPont invented nylon in 1935, and manufacturers first used it commercially in toothbrush bristles in 1938 because it dried faster, retained stiffness when wet, and offered more consistent manufacturing than animal hair (history of nylon toothbrush bristles).
Those material advantages translate directly to narrow-gap cleaning. A filament that resists water absorption can keep its shape during a wet grout job. A filament that holds stiffness can continue pressing against a recessed edge instead of collapsing. Consistent synthetic production also makes it easier to create narrow heads with predictable trim lengths and uniform bristle fields.
Older traditions, more specialized geometry
The design logic didn't appear from nowhere. Brushmaking and interdental-brush traditions had already established the value of twisted or tightly arranged filaments for confined spaces. Documented use of interdental brushes reaches back to at least 1960, with scientific study beginning in the 1970s, while patent records show specialized vacuum and narrow cleaning attachments being formalized earlier, including patents from 1931 and 1940 (history and development of interdental brushes).
Household tools gradually borrowed that precision mindset. Rectangular heads became useful for straight grout joints and window channels. Angled handles improved access around faucet bases and shower corners. Tapered filament tips helped concentrate contact while reducing the harsh scraping that can come from blunt, rigid ends.
Why modern materials feel different
Natural fibers such as animal hair or plant-based tampico can feel pleasant when dry, but moisture changes their behavior. They may absorb water, soften, and dry more slowly. Synthetic fills such as nylon, polypropylene, and PBT can be engineered for more stable stiffness and resistance to routine moisture.
That doesn't mean every synthetic brush lasts indefinitely. Filaments still bend, splay, and shed with use. The improvement is that the manufacturer can control filament diameter, length, density, and trim more consistently, giving you a tool that behaves predictably from the first pass.
Anatomy of a Crevice Cleaning Brush
A grout line may look like a simple slit, yet a brush can either settle into it or skate across its surface. Read the tool as four connected parts: head shape, bristle fill, ferrule, and handle. Each part affects reach, pressure, control, and how safely the brush works around the gap.
A flat head suits a straight joint with a consistent opening. A tapered head narrows toward the tip, so it can enter a tighter grout line without forcing the surrounding tile. A bullet profile follows curved recesses, while an angled wedge sends force into a corner and reduces the wrist twist needed to keep the bristles aligned.
Head and filament choices
Nylon is a flexible choice for wet household cleaning, offering a useful balance between bending and resistance. Polypropylene often feels firmer when lifting rough debris from tracks or channels. PBT is chosen for a synthetic filament that holds its shape during repeated use. Brass-tipped or brass-filled designs require more care. Metal contact can mark or scratch finishes that plastic bristles would leave untouched.
Filament diameter and trim length determine how the brush responds when it meets resistance. Fine, long bristles can reach farther into a narrow opening, but they may fold over when pressed hard. Shorter, thicker bristles make a more forceful stroke and recover their shape more readily. They also need enough clearance, or the head may drag against the surface beside the gap.
Trim shape affects wear as well. A blunt, heavily loaded edge concentrates pressure near the opening, while a tapered or softer tip can reach the recess with less surrounding contact. Bristle density changes how quickly debris fills the head, so a dense brush may scrub strongly but need more frequent rinsing. These choices are functional, not decorative, because filament geometry controls both access and resistance.
Ferrule and handle construction
The ferrule is the joint that holds the tuft and connects it to the handle. A molded plastic ferrule resists rust and helps keep water away from the tuft base. Glued or crimped assemblies can also perform well, but inspect the transition for exposed metal, gaps, or tufts that move when pulled lightly.
A polypropylene handle suits wet work and rinses easily. A TPE grip gives steadier control when your hands are soapy. A wooden dowel feels warm and rigid, but it needs thorough drying after use and is less suitable for repeated soaking or dishwasher cleaning.
| Component | Common Variants | Best For | Trade-off |
|---|---|---|---|
| Head shape | Flat, tapered, bullet, angled wedge | Straight joints, corners, and curved recesses | A specialized profile may be less versatile |
| Bristle fill | Nylon, polypropylene, PBT, metallic-tipped | Wet cleaning, debris lifting, or forceful scrubbing | More stiffness can increase surface risk |
| Ferrule | Molded plastic, crimped metal, glued assembly | Securing tufts and managing moisture | Metal may corrode, while weak joints can loosen |
| Handle | Polypropylene, TPE-grip, wood | Wet control, comfort, or rigid reach | Grip and drying needs vary by material |
Before buying, check the head width, tip shape, filament material, bristle length, and handle angle. If those details are missing, the brush's behavior in your narrowest gap is difficult to predict.
Matching the Right Brush to Each Tight Space
The best configuration changes with the job. A grout line, a window track, a chrome faucet base, and an appliance seam may all look like “tight gaps,” but they hold different debris and tolerate different pressure.
Bathroom grout lines
For a narrow grout joint, choose a slim head with a tapered tip and moderately firm nylon bristles. The taper helps the filaments settle into the joint instead of skating across the tile face. Use short strokes first, especially if the grout is old or already crumbling.
A head that's too aggressive can loosen weak grout. A head that's too broad may flex against the tile and leave the recessed center untouched. Apply cleaner according to its label, allow it to work, and let the brush provide controlled agitation rather than using maximum force immediately.
Window tracks
Window tracks often contain layered dust, hair, and compacted grit. A longer polypropylene head with a hooked or L-shaped profile can reach along the channel and lift debris from the corners. A longer handle also keeps your knuckles away from the frame while you work.
Vacuum loose material first. Brushing a thick layer of dry grit can turn the tool into a particle-covered scraper, especially on painted tracks or finished aluminum.
Sink rims and faucet bases
Chrome and polished fixtures need a softer touch. Choose a softer synthetic fill, ideally with flagged or gently split tips, and use a compact head that can follow the curve around the fitting. Keep pressure light and rinse frequently so loosened mineral residue doesn't become a second source of abrasion.
If the bristles bend sharply against the metal, stop. That usually means the head is too stiff, the angle is wrong, or you're pressing harder than the surface can tolerate.
Appliance seams
Toasters, refrigerator door seals, and control-panel seams often need dry dust removal rather than wet scrubbing. A small brush with short bristles and a non-scratching plastic core can loosen crumbs and lint without gouging the appliance finish. Disconnect appliances from power before cleaning around openings, and avoid pushing debris deeper into vents or electrical spaces.
For a compact option aimed at small household and device gaps, you can compare the configuration of this multifunctional tech cleaning kit with a dedicated grout brush.
| Task | Head Shape | Bristle Type | Handle Length | Why It Works |
|---|---|---|---|---|
| Narrow bathroom grout | Tapered or slim wedge | Moderately firm nylon | Short to medium | Reaches the joint while limiting tile contact |
| Debris-filled window track | Hooked or L-shaped | Firm polypropylene | Medium to long | Lifts compacted material from channels and corners |
| Sink rim or faucet base | Small rounded or angled head | Soft flagged synthetic fill | Short | Follows curves with less risk of dulling the finish |
| Appliance seam | Small flat or tapered head | Short, dry-use plastic bristles | Short to medium | Loosens crumbs and lint without aggressive scraping |
When a Crevice Brush Is the Wrong First Move
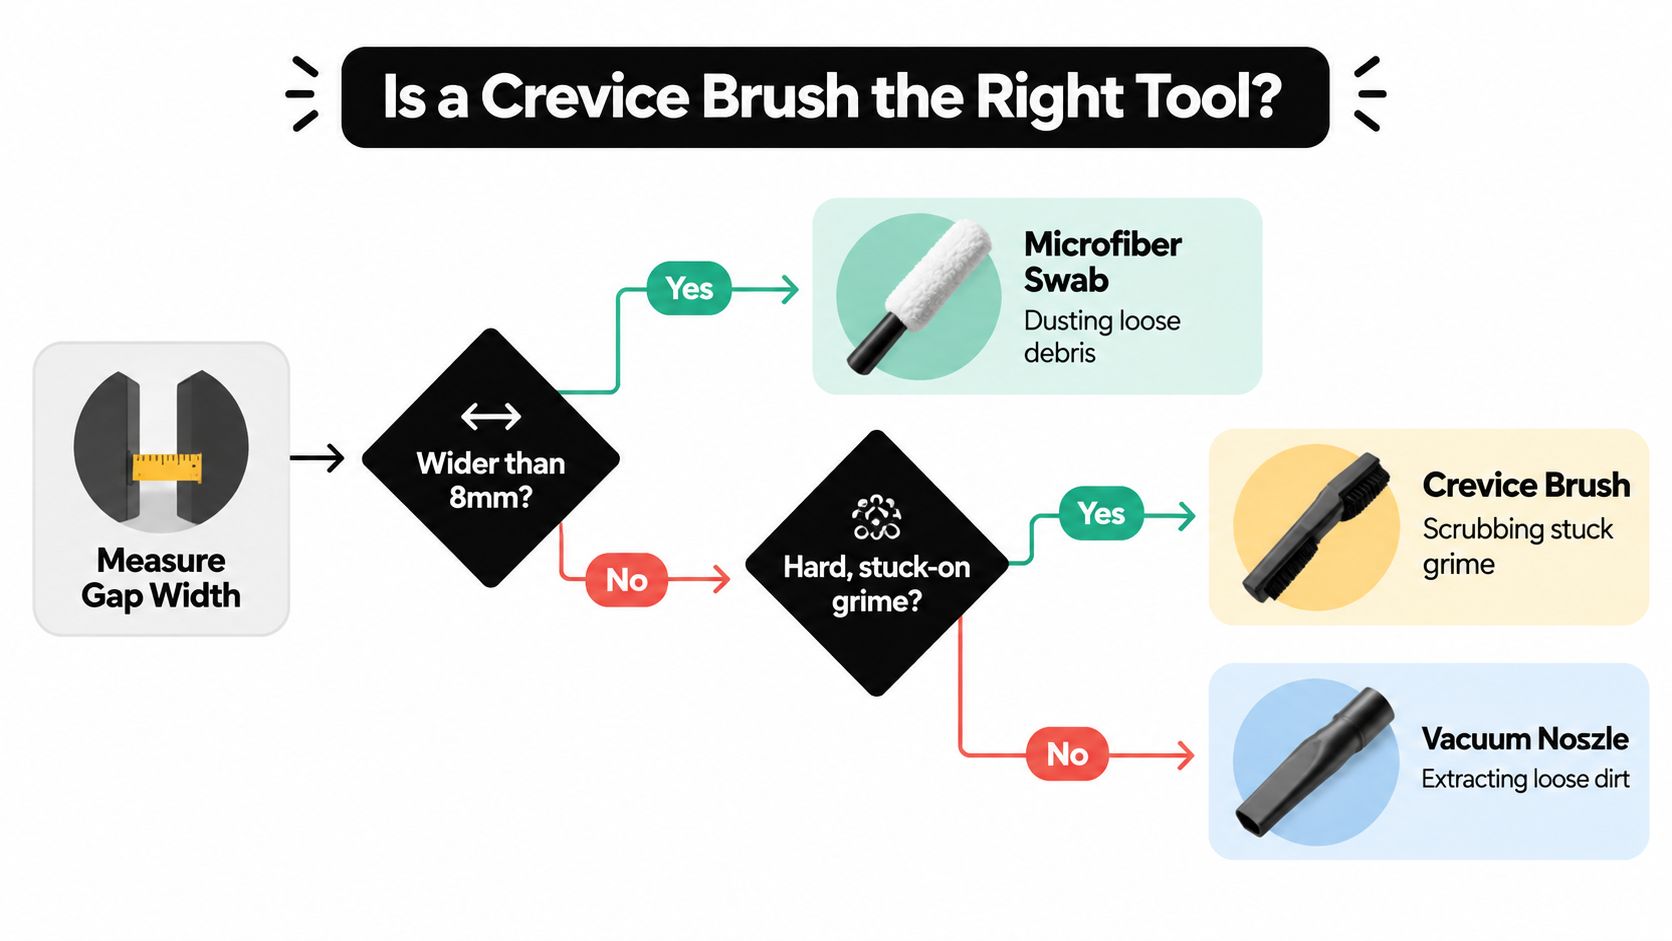
A brush feels like the obvious answer because it can reach where your fingers can't. But loose debris often needs extraction, not agitation. Start by asking what the gap contains and how wide it is.
If the opening is wider than 8 mm, a vacuum nozzle or microfiber swab will often remove loose material more cleanly than a brush (guidance on choosing tools for recessed cleaning). A brush may push dust toward the far end. On a shallow, dry seam, compressed air followed by wiping can be safer because it removes particles before they're ground against the finish.
Use the least aggressive effective method
Sealed grout with mildew deserves caution. Brushing immediately can spread contaminated moisture onto nearby tile and into adjacent gaps. A targeted treatment and appropriate dwell time should come first, followed by controlled brushing only if residue remains.
Painted window tracks and anodized aluminum also call for restraint. Firm bristles can damage a coating, so begin with a soft detailing brush, microfiber swab, or damp cotton swab. Test an inconspicuous area before applying pressure across the visible surface.
Start with removal, not abrasion. A tool that extracts loose dirt usually creates less risk than one that forces the dirt deeper and then scrubs it across a finish.
A useful ladder is:
- Vacuum loose debris.
- Blow out shallow, dry dust where it's safe to do so.
- Wipe residue with a microfiber swab or cloth.
- Brush material that remains lodged in the recess.
- Scrub only when the surface can tolerate stronger friction.
A handheld vacuum with a narrow cleaning attachment can handle the extraction stage before brushing, such as the Pegovo cordless handheld vacuum. The brush earns its place after softer methods have removed what doesn't need scrubbing.
Care, Cleaning, and Replacement Timing
A dirty brush can put yesterday's grime back into today's clean seam. Care starts immediately after use, while residue is still soft and easy to release.
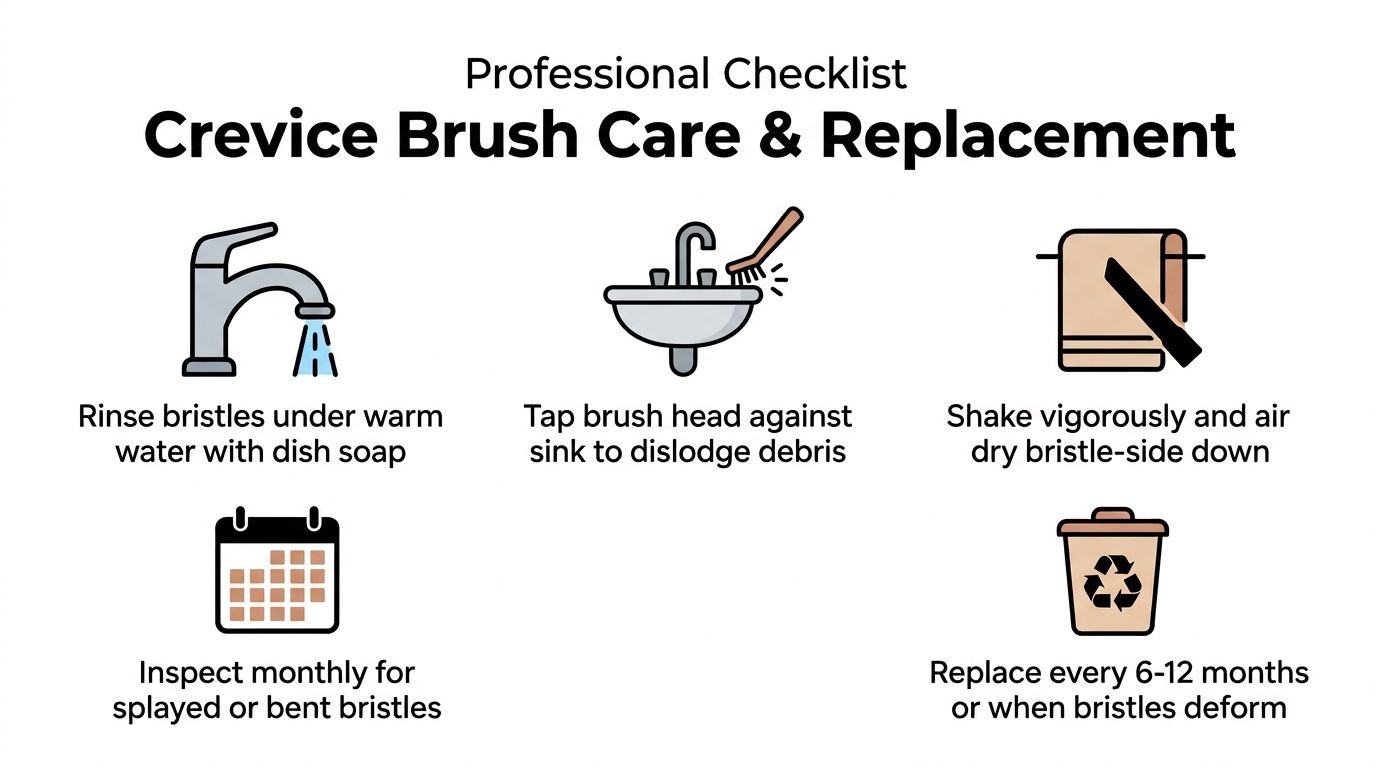
Rinse the bristles under warm water with a small amount of dish soap. Instead of squeezing the tuft field, tap the brush head against the sink to dislodge trapped particles. Squeezing bends the filaments repeatedly and can speed up splaying, while tapping helps release debris without folding the entire bundle.
Dry the head, not just the handle
Stand the brush bristle-up in a dry cup or rack so water can drain away from the ferrule. Pooled moisture near the tuft base can weaken adhesive joints and create an unpleasant storage environment. Don't put the tool back in a closed drawer while the bristles are still damp.
Separate brushes by task. A brush used on a grimy track shouldn't rest with a soft fixture brush, because the bristle tips can transfer residue and become bent under the weight of other tools.
Inspect behavior, not the calendar
Bristle wear tells you more than an arbitrary replacement date. Research on dense, narrow-diameter bristle fields found that higher bristle counts and smaller filament diameters correlated with faster splaying, visible wear, and reduced biofilm removal over time (research on bristle geometry and wear). Fine, dense filaments may enter narrow slots beautifully at first, but they can lose their working shape sooner under demanding use.
Replace the brush when:
- The bristles flare outward: A visibly distorted field no longer directs force into the gap.
- Tufts pull loose: Light tugging should not remove filaments.
- The taper disappears: A worn tip may ride over the recess instead of entering it.
- The surface begins to mark: Frayed or bent filaments can leave scratch lines during a light test on a safe area.
Synthetic bristles can also shed microplastics as they wear. A review of toothbrush-style bristles estimated more than 23.3 × 10^5 particles per person per year, and newer experimental work reported that affordable brushes can shed more particles than premium brushes (review of microplastic shedding from bristles). That evidence doesn't give every household brush the same shedding profile, but it supports replacing visibly worn tools rather than laundering or forcing them through another difficult job.
Choosing the Best Crevice Brush for Your Home
The useful buying rule is simple: read the gap, then read the bristle. Measure the narrowest opening, decide whether you're dealing with loose dry debris or stuck wet residue, and consider whether the surface is hard tile, finished metal, painted aluminum, plastic, or a delicate seal.
A budget set of straight nylon brushes can cover several everyday seams, while a specialty angled grout brush may provide better control in one demanding area. You don't necessarily need one elaborate tool. Two complementary heads, one slim and flexible and one firmer with a longer reach, may cover more situations than a single brush that sits awkwardly in every gap.
Synthetic bristles bring useful water resistance and shape retention, but they also raise a wear and shedding question. Rotate a brush out when the filaments splay, loosen, or start marking surfaces. Avoid treating worn tools as disposable after a fixed calendar period if they remain in good shape, but don't keep using them only because the handle still looks clean. The TrentonChoice cleaning collection offers household cleaning tools for comparing practical configurations alongside other home-care supplies.
Choose the least aggressive brush that reaches the residue, use extraction before agitation, and let the gap's geometry determine the head. That approach gives you cleaner joints with less wasted pressure, fewer damaged finishes, and a brush that remains useful for the work it was designed to do.
TrentonChoice offers practical household cleaning tools, including a hard-bristle crevice brush set for grout, fixtures, window tracks, and other tight gaps. Visit TrentonChoice to compare cleaning tools and choose a configuration that matches the spaces you need to maintain.
Prepared with Outrank tool